Yesterday, for the umpteenth time, I thought about writing up a blog post thanks to what I'd been doing.
It was to be titled "90 MPH Dog Poo" and discuss what happens when you take a string trimmer into a not quite completely cleaned up (despite your best efforts) dog run.
But I changed my mind.
You can all thank me now.
Have a nice day!
Saturday, January 7, 2012
Thursday, January 5, 2012
When A Well Pump Dies - Part I
Apparently our well pump stopped working a few weeks back. It takes a while to notice this, though, at least for us. I have to note the water level in the storage tank dropping. Also, in this case, and elevated PG&E bill was a giveaway too, though I didn't know that at the time it arrived.
I called our preferred well guy and had him do some diagnosis. I had already verified that we had power getting to the top of the well and that the pump should have been running, but no water was coming out. He was able to duplicate my results and noted that the current flowing in the wires meant the pump was probably running. He bypassed the pump controller and the problem continued, so whatever the issue was it was in the well pump, 380 feet below ground. Oh joy.
Today he came back with his truck to pull the pump and find out what was going on. These pictures document that little voyage of discovery.
First, here's what the well head looked like before things got started:

The line on the right (with the gray box) is the electrical supply that drives the pump. The line in the middle going into the ground is the water discharge. That goes off to our storage tanks. The strange looking plastic pipe on the left is a home made sulfur discharge vent, since the old metal one corroded and goobered up the threads it was screwed into. The first 50 feet of the well is surrounded by concrete to keep ground water from contaminating the well. Most of that 50 feet has only a couple of inches around it, but the cap has a much wider pad to protect the well head from lawn mowers and the like.
And here we see what it looks like with the well seal opened up and the first couple of feet of pipe extracted:

The electrical was disconnected, the sulfur vent removed, and the union in the water line opened up. At this point all 380 feet of pipe are hanging from a cable on a truck designed for this purpose. It looks like this:

That picture was taken a bit later. You can see a 20' length of schedule 80 PVC pipe hanging from the rig. The pipes are threaded and attached with brass couplings. An odd looking device is used to clamp the pipe in place while the section above is disconnected and set aside. Here's a closer view of that:

The metal thing sitting crosswise at the bottom is the above mentioned clamp. The technician is using the lift to pull the pipe up. His assistant is pulling the electrical wires and a safety rope off to the side to keep them out of the way. (Note that those wires and rope are taped to the pipe at regular intervals, so the tape has to be cut and removed as each pipe is pulled up too.) Also as the pipe comes up the technician wipes the accumulated slime off of it. And in our case there is a lot of that slime. Some combination of iron and sulfur bacteria make for a nasty thick layer of gunk all over everything. (And there will be a better picture of that later.)
As the end of the 19th section of pipe comes out of the ground, we see the well pump emerge, and just before that, a surprise:
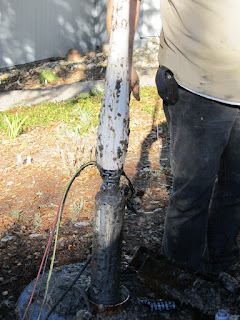
OK... this may not look like much to the uninitiated but that's bad. Most of the PVC pipe above the pump is 1" diameter. The last two sections are 1.25" for some technical reason, but they do NOT bow out like that. That's bad. That's very bad.
What it means is that sometime a month or more ago the pump ran, pumped all the water out of the well, but then did not turn off. As it kept running it got hot, since water is the usual coolant for the motor. As the pump got hot it heated the pipe above the pump got too, and the plastic softened. Eventually it got so hot - despite there being water inside the pipe - that a hole opened up in the pipe and the water drained out.
So that bowed out area just above the pump is a bad thing. It means that something is wrong with the pump, the pump controller, or both. Now, as it happens, we had a long brownout or two just over a month ago during a big wind storm. For one of them I was home and awake and ran around turning off breakers, though I honestly don't remember if I got the breaker for the well pump or not. I should have, but who knows. The other brownout, if it affected us, hit while I was asleep, or so I gather from a neighbor. The first was something like 20 minutes long and I have no idea about the other, but either might have caused a fault that could result in this sort of behavior.
Or there might be other causes. Time will tell.
Here's a picture of the entire well pump sitting on the pad around the well:

The top half is the impeller, the bottom half is the motor. Water enters through the grid in the middle and we can see that isn't too blocked up.
Here's a closer view of the slime from the well and the bottom of the pump. I hope you haven't eaten recently:

Yeah. Sorry about that.
And finally, here's the pipe from the well laid out ready to go back in once the problem is fully diagnosed:

The bulge in the last pipe is pretty obvious there. The large, black, football shaped thing two pipes over from the left is a torque arrestor, to keep the pipes from twisting and banging around when the motor kicks in. It fits just inside the six inch plastic pipe that lines the well.
My well guy took the pump and controller off with him today. He will clean up the pump, bench test it all, and find the problem. If the controller is bad he will replace it. In addition - since this is the second time we've seen that pipe bulge up due to a hot pump - he may replace the last 20' section of PVC with stainless steel, to reduce the chances of that happening again. (Of course, if it does happen the stainless will conduct heat better, and it might just move the problem, or it might cause the pump to burn out once it has run too long.)
Hopefully tomorrow he will be able to tell me exactly what failed, and we can start looking to avoid the root cause of the problem. That may mean trying to find some way to protect our entire home from brownouts. We already have a whole house surge protector installed, but nothing keeps a brownout from crippling us.
More when we know it. Whee.
I called our preferred well guy and had him do some diagnosis. I had already verified that we had power getting to the top of the well and that the pump should have been running, but no water was coming out. He was able to duplicate my results and noted that the current flowing in the wires meant the pump was probably running. He bypassed the pump controller and the problem continued, so whatever the issue was it was in the well pump, 380 feet below ground. Oh joy.
Today he came back with his truck to pull the pump and find out what was going on. These pictures document that little voyage of discovery.
First, here's what the well head looked like before things got started:

The line on the right (with the gray box) is the electrical supply that drives the pump. The line in the middle going into the ground is the water discharge. That goes off to our storage tanks. The strange looking plastic pipe on the left is a home made sulfur discharge vent, since the old metal one corroded and goobered up the threads it was screwed into. The first 50 feet of the well is surrounded by concrete to keep ground water from contaminating the well. Most of that 50 feet has only a couple of inches around it, but the cap has a much wider pad to protect the well head from lawn mowers and the like.
And here we see what it looks like with the well seal opened up and the first couple of feet of pipe extracted:

The electrical was disconnected, the sulfur vent removed, and the union in the water line opened up. At this point all 380 feet of pipe are hanging from a cable on a truck designed for this purpose. It looks like this:

That picture was taken a bit later. You can see a 20' length of schedule 80 PVC pipe hanging from the rig. The pipes are threaded and attached with brass couplings. An odd looking device is used to clamp the pipe in place while the section above is disconnected and set aside. Here's a closer view of that:

The metal thing sitting crosswise at the bottom is the above mentioned clamp. The technician is using the lift to pull the pipe up. His assistant is pulling the electrical wires and a safety rope off to the side to keep them out of the way. (Note that those wires and rope are taped to the pipe at regular intervals, so the tape has to be cut and removed as each pipe is pulled up too.) Also as the pipe comes up the technician wipes the accumulated slime off of it. And in our case there is a lot of that slime. Some combination of iron and sulfur bacteria make for a nasty thick layer of gunk all over everything. (And there will be a better picture of that later.)
As the end of the 19th section of pipe comes out of the ground, we see the well pump emerge, and just before that, a surprise:

OK... this may not look like much to the uninitiated but that's bad. Most of the PVC pipe above the pump is 1" diameter. The last two sections are 1.25" for some technical reason, but they do NOT bow out like that. That's bad. That's very bad.
What it means is that sometime a month or more ago the pump ran, pumped all the water out of the well, but then did not turn off. As it kept running it got hot, since water is the usual coolant for the motor. As the pump got hot it heated the pipe above the pump got too, and the plastic softened. Eventually it got so hot - despite there being water inside the pipe - that a hole opened up in the pipe and the water drained out.
So that bowed out area just above the pump is a bad thing. It means that something is wrong with the pump, the pump controller, or both. Now, as it happens, we had a long brownout or two just over a month ago during a big wind storm. For one of them I was home and awake and ran around turning off breakers, though I honestly don't remember if I got the breaker for the well pump or not. I should have, but who knows. The other brownout, if it affected us, hit while I was asleep, or so I gather from a neighbor. The first was something like 20 minutes long and I have no idea about the other, but either might have caused a fault that could result in this sort of behavior.
Or there might be other causes. Time will tell.
Here's a picture of the entire well pump sitting on the pad around the well:

The top half is the impeller, the bottom half is the motor. Water enters through the grid in the middle and we can see that isn't too blocked up.
Here's a closer view of the slime from the well and the bottom of the pump. I hope you haven't eaten recently:

Yeah. Sorry about that.
And finally, here's the pipe from the well laid out ready to go back in once the problem is fully diagnosed:

The bulge in the last pipe is pretty obvious there. The large, black, football shaped thing two pipes over from the left is a torque arrestor, to keep the pipes from twisting and banging around when the motor kicks in. It fits just inside the six inch plastic pipe that lines the well.
My well guy took the pump and controller off with him today. He will clean up the pump, bench test it all, and find the problem. If the controller is bad he will replace it. In addition - since this is the second time we've seen that pipe bulge up due to a hot pump - he may replace the last 20' section of PVC with stainless steel, to reduce the chances of that happening again. (Of course, if it does happen the stainless will conduct heat better, and it might just move the problem, or it might cause the pump to burn out once it has run too long.)
Hopefully tomorrow he will be able to tell me exactly what failed, and we can start looking to avoid the root cause of the problem. That may mean trying to find some way to protect our entire home from brownouts. We already have a whole house surge protector installed, but nothing keeps a brownout from crippling us.
More when we know it. Whee.

Tuesday, December 13, 2011
CSA 48 - County Fire Funding Around My Home
Today I attended a Santa Cruz County Board of Supervisors Meeting. What fun. Not.
I did so to keep tabs on an issue near and dear to my heart... maintaining fire and EMS response service in my area during the non-fire season. I've mentioned that on Facebook and in a couple of other places, and people were curious, so I wrote up my thoughts on the meeting this evening and am posting them here.
I don't claim this is complete, correct, or consistent. It's the best I could do given the situation, the contents of the meeting, and my temperament. I hope it isn't entirely wrong, and I will try to correct it somehow if I find I am wrong about things.
With that disclaimer...
Board Of Supervisors Meeting - Partial Writeup - Dec 13, 2011
A somewhat inflammatory and editorialized document by Jeff Powell.
These are my impressions and opinions. Your mileage may vary.
Remember, though, that government is like making sausage, in a very big and slow factory.
8:15 am: park car in 3 hour free parking lot across the river from the county building.
In the meeting room I pick up a copy of the official agenda, which lists our item as #56. Seems like it will be forever before we discuss funding for County Fire, but that doesn't do justice to what really happened. In any case, for reference, here is what we were at the meeting to discuss, word-for-word from the agenda:
56. Consider report on the state budge and associated impacts on the California Department of Forestry and Fire Protection (CAL FIRE) and further discussion of County Fire Service Area 48 (CSA 48) service delivery options for changing the contracted level of service with CAL FIRE commencing in the fiscal year 2013-2014, and taking related actions.
All clear now? Hope so. But I have NO idea what that really means.
8:30 am: meeting begins.
A sea of red shirted citizens (numbering 50 or so) concerned about CSA 48 is present, but that doesn't matter yet. First we get some technical preliminaries followed by open comments from the public about things not on the agenda. During the preliminaries at least one agenda item related to PG&E smart meters was removed from the "consent agenda" (things that are just "accepted" but not commented upon by the board or the public as far as I can tell) and moved to the "regular agenda", which allows for comment by anyone that can fog a mirror when they exhale. Despite that, quite a few members of the public wanted to discuss smart meter related issues during the comment period allotted to things not on the agenda, and wasted a lot of time as a result. In addition concerns were raised about Occupy Santa Cruz and the county's recent moves towards it, and there were many requests for a moratorium on foreclosures in the county. Oh, and some comments about a program that helped people working for the county make better choices about food and lifestyle.
Then we had 15 minutes or so of thanking a retiring county employee.
Then the Board of Supervisors recessed to run a second meeting - one related Zone 5 of the Santa Cruz Flood and Water Conservation district to happen. No, really... they stopped one meeting and changed it to another one, just like that. The BOS members are also members of this new group along with a few others, but there wasn't much happening here. Done in 15 minutes.
10:30 am, give or take: morning break. During this time I go move my car since it is clear that 11:15 is going to come and go before we're done. I put it in the 2 hour lot in front of the county building. After all, we should be done by 12:30, right? (Hint: not.)
10:45 am-ish: They start up again and immediately recess for a different flood control meeting: this one about zone 7 instead of zone 5. This one was much more contentious and went on for nearly an hour. However, in the end, I think nothing of great import happened - everything they voted on passed unanimously - and the project they want to do (to improve flood control down near Watsonville) wasn't impeded or slowed down as far as I can tell.
Editorial comment: by this point there are quite a few people I think should never be allowed to speak in public, and I am pondering how to make choking some of those people to death legal. But I digress.
It is important to note, however, that for over 3 hours the group of people that had come to speak and hear about the County Fire issue is dwindling. People have - gasp! - lives and jobs and commitments. Three hours after the meeting started we hadn't gotten to our issue despite being told we'd be "first" by someone. Go figure.
Approximately 11:45 am now, and we finally get to the County Fire related issue. Surprisingly I have not gnawed off any of my own limbs in a desperate attempt to keep myself awake.
Chief Ferriera and someone else (didn't catch her name) made some initial comments about the situation. As far as I can remember these were the high points (for me) of the discussion that ensued:
- County fire will run out of money sometime around the summer of 2013 - 18 months or so from now.
- Funding for County Fire comes from two primary sources, both tied to home values: 1.x million per year from property taxes directly; 2.x million per year from CSA 48 tax that is also paid via the property tax bill. I don't have exact numbers, sadly.
- The county has done polling and (surprise, surprise!) when they ask people something like "Are you willing to pay more for the fire service you already get?" the answer has only 60% of people saying yes, and we'd need 66% to pass a tax increase. Argh! I'm honestly surprised support is that high. Clearly a lot of education is needed, and not just of the voters. How about a poll question like: "The dedicated fund that pays for your County Fire service is running out of money and it will shut down completely during the off season in the fall of 2013 as a result. Would you support an increase in a dedicated tax or fee to keep it running instead of shutting down? And note that if you don't have fire service you probably can't sell your home and its value will be less than that of dog spit." Oddly I suspect that support would be a bit higher than just 60% if the question is phrased properly. I apologize if I have misrepresented the polling work, but in reality polling is just about as close to a black art as you are going to find, and the answers you get are inescapably related to the exact wording of the question you ask.
- Governor Jerry Brown is looking to impose an additional fee on home owners in SRA (state responsibility area) land of $180 per year to make up other lost funding sources. There may be a $30 reduction in that fee for those who are covered by another fire protection district like CSA 48. That fee, however, would probably not come back to County Fire in any way to support their activities as far as I can tell. Many of those living in CSA 48 will wind up paying that fee to the state, making many wonder about the public's willingness to stomach a tax increase in addition to that fee.
- There are a few ways to save some money other than shutting down county fire entirely. As with everything (except the agenda itself) I have nothing in writing, so I am doing my best from memory to remember these. They might move some people around from administrative jobs to fire fighting roles. They might offload the program to name driveways and renumber houses to some other department. They might shut down a single station. They might shut down all of County Fire. Remember, this is off-season only... during the summer the state picks up the tab for the entire thing. (Editorial comment: the program to name driveways and renumber houses is the least liked - and possibly most stupid - program in existence. Why it still gets any funding is beyond me entirely. It should have been killed years ago. Technically it should never have been started.)
- During discussion Chief Ferriera says something about costs vs. income. This was off the cuff, and so I wouldn't hold his feet to the fire, but what he indicated was that costs (for personnel and so on) have gone up about 3% over the last 3 years, but home values have gone down substantially during that same period thanks to the economy and housing crisis, dropping revenues. (I can confirm that last from deep, personal, and costly experience.) That may explain some or all of the reason that CSA 48 funds haven't kept up with the expenses of County Fire, though I would like a real accounting of that, and I may ask John Leopold for that information separately. We'll need it to justify any tax or fee increase to homeowners eventually in any case.
- There was no discussion of how (or if) the volunteer fire department would continue to operate with Cal Fire shut down.
With the public comments ended the supervisors made more comments themselves. John Leopold thanked us for showing up en-mass and indicated he would help champion the cause. Supervisor Pirie took pains to point out where the public comments were wrong or misleading in various ways, but she did also ask someone else (name unknown to me) to discuss where county funds come from and go to. That was interesting, at least to me. Summarizing that and a few other things that were said leads to this:
- Proposition 13 froze property tax revenues where they were when it was passed. So Santa Cruz County gets $0.13 per dollar of property taxes collected put into its general fund. Santa Clara county, by contrast, gets over $0.60 per dollar collected put into its general fund. This sort of inequity has never been addressed, and years later is causing all kinds of pain.
- Of the $400 million or so dollars that Santa Cruz County spends per year, something like 90% comes with strings, requiring it to be spent in certain ways. Thus the supervisors are left with 10% or less that they supposedly control.
- Of that 10%, though, there are all kinds of mandated spending that has to happen, which means there is substantially less flexibility in how they can spend money in general.
- In short, there isn't enough money in the general fund - or anywhere else the county supervisors can get at - to "fix" this funding problem for County Fire. We have to pay for this ourselves, somehow, and to do that we're going to have to pass a tax measure of some sort in the next 18 months.
With one change - asking Chief Ferriera and/or others to tell the state folks that the County of Santa Cruz needs some of that $150/$180 annual fee back somehow, or at least mention the possibility - the supervisors voted "aye" on the agenda item.
I honestly don't know what that means. As I say, the agenda item almost isn't actually written in English, and I am not at all sure what was accomplished today in any formal sense.
Less formally, though, I think the supervisors saw a lot of people from the Loma Prieta area show up on their door step and say "this sucks". How (or if) that will translate into fixes and plans over the longer term I don't know. We will, however, have to do this again and again and again. We'll have to continue to show up at these meetings and telling them that shutting County Fire down during the off season is not an option.
We will also have to campaign for whatever tax or fee finally comes out of this. We'll have to lobby our friends and neighbors over this issue, trying to get 66% of those that live in the CSA 48 area to vote yes and pay a small tax instead of paying huge fire insurance premiums and finding our houses worth next to nothing.
I hope you're all ready for more work. It's coming, whether you want it to or not.
Sunday, November 20, 2011
Dumber than a box of rocks...
Yes, I am. Really.
In this post I discussed some surprising rainfall numbers. Turns out, though, I totally misread the official rain gauge. It seems that 0.20" and 0.02" are very different numbers. Go figure.
sigh
So... overall, this means that things are more-or-less normal with the gauges. The evaporation issue is still real, and the butterfly gauge still reads a lot more than the others.
I will go hide now. Well, once I get a disclaimer on that original post. The spreadsheet has been updated to reflect reality.
In this post I discussed some surprising rainfall numbers. Turns out, though, I totally misread the official rain gauge. It seems that 0.20" and 0.02" are very different numbers. Go figure.
sigh
So... overall, this means that things are more-or-less normal with the gauges. The evaporation issue is still real, and the butterfly gauge still reads a lot more than the others.
I will go hide now. Well, once I get a disclaimer on that original post. The spreadsheet has been updated to reflect reality.
Saturday, November 19, 2011
Unexpected Rainfall Numbers
UPDATE ON 11/20/11: this post contains an error of vast and troubling proportion: 0.20" is not the same as 0.02". Yours truly apologizes and retracts it here.
We had something that might have been called rain yesterday. It was very tiny drops, off and on, for hours. My wife might have called it "measurable fog." It was still going after dark so I left reading the gauges for this morning. The results, though, are a surprise:
Well, my best guess is that we had plenty of evaporation overnight. Things were dryish this morning, which means the water went somewhere. And the three gauges that had only a trace also have the largest openings, making it easy for evaporating water to escape.
The butterfly gauge had more in it earlier in the day, yesterday, than 0.10". I noted it in the afternoon when I picked up the mail, but I wasn't taking readings as it was still raining at the time. So it must have evaporated out of there. No one emptied it, I know that.
The official gauge is interesting. Because it is a small cylinder enclosed in (and protected by) a larger cylinder, and since there is a funnel covering most of the interior cylinder and all of the outer cylinder, I suspect evaporation is slower. It's a pretty small hole for the water to evaporate out of in any case, so while it can happen, it takes more time.
In short, though it seems counter intuitive, I think the official gauge wins again, and that it is design flaws in all the others that made them read too low this time around.
Not what I anticipated - particularly with the butterfly gauge - but it makes sense.
The spreadsheet has been updated with the new numbers.
We had something that might have been called rain yesterday. It was very tiny drops, off and on, for hours. My wife might have called it "measurable fog." It was still going after dark so I left reading the gauges for this morning. The results, though, are a surprise:
- The "official" gauge - the one I trust the most so far - read 0.20". That seemed to make sense to me on the level of gut feel. Everything was wet for some time yesterday.
- The old yellow, weather.com, and wedge gauges, though, were all either empty or showed just a trace. Nothing measurable in any of them.
- The butterfly gauge - which usually reads at least twice what the others claim - contained just 0.10".
Well, my best guess is that we had plenty of evaporation overnight. Things were dryish this morning, which means the water went somewhere. And the three gauges that had only a trace also have the largest openings, making it easy for evaporating water to escape.
The butterfly gauge had more in it earlier in the day, yesterday, than 0.10". I noted it in the afternoon when I picked up the mail, but I wasn't taking readings as it was still raining at the time. So it must have evaporated out of there. No one emptied it, I know that.
The official gauge is interesting. Because it is a small cylinder enclosed in (and protected by) a larger cylinder, and since there is a funnel covering most of the interior cylinder and all of the outer cylinder, I suspect evaporation is slower. It's a pretty small hole for the water to evaporate out of in any case, so while it can happen, it takes more time.
In short, though it seems counter intuitive, I think the official gauge wins again, and that it is design flaws in all the others that made them read too low this time around.
Not what I anticipated - particularly with the butterfly gauge - but it makes sense.
The spreadsheet has been updated with the new numbers.
Wednesday, November 16, 2011
Rain Data Now Available
So... just because a few may be interested, I have added a link to get a PDF version of the current rain totals for my home to the right hand column of this blog. I keep the data in google docs and Google claims it gets updated within five minutes of any of my changes to the underlying spreadsheet.
This way you don't have to ask if you care. Just go to http://powelltriangle.blogspot.com/ and click on the link. You can see how the various gauges compare and what the total rainfall for the season is so far. Interesting, eh?
That link, by the way, is also right here.
I should also link to the two earlier posts about this silliness:
Those posts document what I am doing and why. Necessary background material if you are going to understand this particular oddity of my behavior.
This way you don't have to ask if you care. Just go to http://powelltriangle.blogspot.com/ and click on the link. You can see how the various gauges compare and what the total rainfall for the season is so far. Interesting, eh?
That link, by the way, is also right here.
I should also link to the two earlier posts about this silliness:
Those posts document what I am doing and why. Necessary background material if you are going to understand this particular oddity of my behavior.
Saturday, November 12, 2011
Rain Gauges - actual data from actual rain
As per the earlier post about rain gauges we are testing several to see how they compare. While this isn't a scientific test, it is fun, and some people even expressed interest in it. We had some rain yesterday, so I took pictures of the gauges this morning as I read them, and figured I'd write that up. In summary, and in order of apparent accuracy, the gauges read:
The "official" gauge, which I keep wanting to (incorrectly) call the NOAA gauge:

What you see here is the easiest gauge of all to read if the total amount of rain is less than one inch. I didn't even remove it from the mounting bracket or pull out the central tube. All I did was wipe the outside of the big cylinder to get rid of the condensation, point the camera, and click. 0.33" is pretty simple to read, don't you think?
Note the bird dropping in the bottom of the tube. That might add a tiny bit too much to the total, but much less than the accuracy of 0.01", so I ignored it. The funnel has a diameter of three or four inches, so stuff like this will fall in from time to time.
Also note that the scale on the central tube is simple and linear. Very easy to read, and the meniscus is easy to see, even through the outer tube.
The only problem with this gauge is what happens when you have more than one inch of rainfall. It overflows into the outer tube and you have to pour it into the central tube in portions to get the total amount. Accuracy is still good, but convenience is not. Then again, it can measure up to 12 inches of rain in one shot that way, which is better than anything else I've found so far.
The wedge gauge:

This is the bottom of the wedge shaped gauge. I'm not quite holding it vertically in the picture, but it claims 0.32" of rain when held properly.
Looks a bit hard to read, don't you think? It is, for a few reasons.
First, the embossed numbers are pretty small. If you need reading glasses in general, you will need them to read this gauge. Not so nice if it's still raining when you're trying to read it.
Second, the embossing isn't all that pronounced. Getting it to show in the picture was tough. (You can click on the picture to see the full sized view, which helps, but it still isn't easy to read.)
Third, there is no paint on the embossing. that would make this a lot easier to read, but also add to the manufacturing costs.
Finally, and most critically in my opinion, the scale on this gauge is not linear. Since it is wedge shaped there are places where the embossed numbers change from what you might expect.
Here's the same picture that I have hand edited in an image editor to make the English scale more obvious.

Note the numbers getting closer together as you head up the gauge. Also note that we go from increments of 0.05" to 0.1" after the 0.2" mark. And there are other places where similar changes happen farther up the gauge.
Reading this one isn't nearly as simple as it should be.
Accuracy is probably pretty good. The difference between 0.33" and 0.32" is pretty much in the noise range. Most if not all of this rain fell yesterday and in the evening, but the gauges sat out in the fog all night before they were read. If the wedge gauge collects less fog than the official gauge, it might read slightly less just for that reason, for example.
Anyway, some paint would sure help this one.
The Old Yellow gauge:

This is the 19 year old gauge we've been using all along. It's nice and simple, but as you can see it's a bit hard to read.
If you remember your chemistry class, though, you read the bottom of the meniscus, so that (when held vertically) is about 0.3" of rain.
The embossing is easier to read on this one than on the wedge, but still no paint.
And don't plan on reading this to anything more accurate than 0.05". Even that is a guess in most cases, since even the slightest tilt of your hand will move the meniscus around a fair bit.
The weather.com gauge:

This gauge has a strange combination of things that make me wonder about it.
The large numbers on the front (1, 2, etc) are painted and embossed, but useless for anything except to remember which inch you're "in" when reading the thing.
The lines on the sides are painted only - not embossed - which means that they will flake off and the gauge will be unreadable as soon as the sun does it in.
When held vertically - which I am not quite doing in the picture - the meniscus was right at 0.3". Like the yellow gauge, though, reading anything other than 0.05" increments isn't going to happen.
In all I am not sure why weather.com put their name on this thing. I suspect a season or two and it will be unreadable, and I wonder about its accuracy. Determining that will require a storm that gives us 3 or 4 inches of rain, so the linearity of the scale and the accuracy of the painted lines can be compared with the official and wedge gauges.
The butterfly gauge:

This is the last - and least accurate - gauge. Though it is hard to tell from the image that tube is held just about vertically, and yes it really claims we got 0.8" of rain, where the others all said 0.3" - 0.33".
Like the weather.com gauge, the marks on the tube are only painted on, not embossed. That, however, is because the tube is made of glass, not plastic. Kind hard to emboss glass like this on the cheap.
The paint will, no doubt, come off with enough UV exposure, so it would probably be useless in a couple of seasons, even it it wasn't wildly inaccurate, which makes it effectively useless now.
But why is it inaccurate? Simple... look at the top of the tube, which is what it is hung from in that brass holder:

See that lip? Much of the rain that lands on it runs into the gauge, but the scale is calibrated only for the inner diameter of the tube. The net result is that the gauge collects a lot more water than it should given the scale, and the numbers are way off.
And since that lip is curved, I suspect wind has interesting affects too. If there is no wind as the rain falls it is possible that more of the water that hits the lip winds up in the tube. if there is wind, though, some may blow off the lip and result in a different - though still inaccurate - reading. This is speculation on my part, but so far this gauge doesn't consistently read as a multiple of any other gauge, so there is something odd going on.
Anyway, good rain gauges have a knife-like edge at the top to clearly define the collection area, not a hazy, rounded boundary like this one.
I will keep this gauge in the set and collecting data from it though I know it is useless for real record keeping. It is actually kind of fun to see just how far off it can be. More than 2X in this rain, obviously, but the range of differences is fascinating to a nerd like me.
There you have it... some information on the various gauges so far. Interesting to me, at least. Hopefully you too.
- 0.33" - official gauge
- 0.32" - wedge shaped gauge
- 0.3" - old yellow gauge
- 0.3" - weather.com gauge
- 0.8" - butterfly gauge
The "official" gauge, which I keep wanting to (incorrectly) call the NOAA gauge:

What you see here is the easiest gauge of all to read if the total amount of rain is less than one inch. I didn't even remove it from the mounting bracket or pull out the central tube. All I did was wipe the outside of the big cylinder to get rid of the condensation, point the camera, and click. 0.33" is pretty simple to read, don't you think?
Note the bird dropping in the bottom of the tube. That might add a tiny bit too much to the total, but much less than the accuracy of 0.01", so I ignored it. The funnel has a diameter of three or four inches, so stuff like this will fall in from time to time.
Also note that the scale on the central tube is simple and linear. Very easy to read, and the meniscus is easy to see, even through the outer tube.
The only problem with this gauge is what happens when you have more than one inch of rainfall. It overflows into the outer tube and you have to pour it into the central tube in portions to get the total amount. Accuracy is still good, but convenience is not. Then again, it can measure up to 12 inches of rain in one shot that way, which is better than anything else I've found so far.
The wedge gauge:

This is the bottom of the wedge shaped gauge. I'm not quite holding it vertically in the picture, but it claims 0.32" of rain when held properly.
Looks a bit hard to read, don't you think? It is, for a few reasons.
First, the embossed numbers are pretty small. If you need reading glasses in general, you will need them to read this gauge. Not so nice if it's still raining when you're trying to read it.
Second, the embossing isn't all that pronounced. Getting it to show in the picture was tough. (You can click on the picture to see the full sized view, which helps, but it still isn't easy to read.)
Third, there is no paint on the embossing. that would make this a lot easier to read, but also add to the manufacturing costs.
Finally, and most critically in my opinion, the scale on this gauge is not linear. Since it is wedge shaped there are places where the embossed numbers change from what you might expect.
Here's the same picture that I have hand edited in an image editor to make the English scale more obvious.

Note the numbers getting closer together as you head up the gauge. Also note that we go from increments of 0.05" to 0.1" after the 0.2" mark. And there are other places where similar changes happen farther up the gauge.
Reading this one isn't nearly as simple as it should be.
Accuracy is probably pretty good. The difference between 0.33" and 0.32" is pretty much in the noise range. Most if not all of this rain fell yesterday and in the evening, but the gauges sat out in the fog all night before they were read. If the wedge gauge collects less fog than the official gauge, it might read slightly less just for that reason, for example.
Anyway, some paint would sure help this one.
The Old Yellow gauge:

This is the 19 year old gauge we've been using all along. It's nice and simple, but as you can see it's a bit hard to read.
If you remember your chemistry class, though, you read the bottom of the meniscus, so that (when held vertically) is about 0.3" of rain.
The embossing is easier to read on this one than on the wedge, but still no paint.
And don't plan on reading this to anything more accurate than 0.05". Even that is a guess in most cases, since even the slightest tilt of your hand will move the meniscus around a fair bit.
The weather.com gauge:

This gauge has a strange combination of things that make me wonder about it.
The large numbers on the front (1, 2, etc) are painted and embossed, but useless for anything except to remember which inch you're "in" when reading the thing.
The lines on the sides are painted only - not embossed - which means that they will flake off and the gauge will be unreadable as soon as the sun does it in.
When held vertically - which I am not quite doing in the picture - the meniscus was right at 0.3". Like the yellow gauge, though, reading anything other than 0.05" increments isn't going to happen.
In all I am not sure why weather.com put their name on this thing. I suspect a season or two and it will be unreadable, and I wonder about its accuracy. Determining that will require a storm that gives us 3 or 4 inches of rain, so the linearity of the scale and the accuracy of the painted lines can be compared with the official and wedge gauges.
The butterfly gauge:

This is the last - and least accurate - gauge. Though it is hard to tell from the image that tube is held just about vertically, and yes it really claims we got 0.8" of rain, where the others all said 0.3" - 0.33".
Like the weather.com gauge, the marks on the tube are only painted on, not embossed. That, however, is because the tube is made of glass, not plastic. Kind hard to emboss glass like this on the cheap.
The paint will, no doubt, come off with enough UV exposure, so it would probably be useless in a couple of seasons, even it it wasn't wildly inaccurate, which makes it effectively useless now.
But why is it inaccurate? Simple... look at the top of the tube, which is what it is hung from in that brass holder:
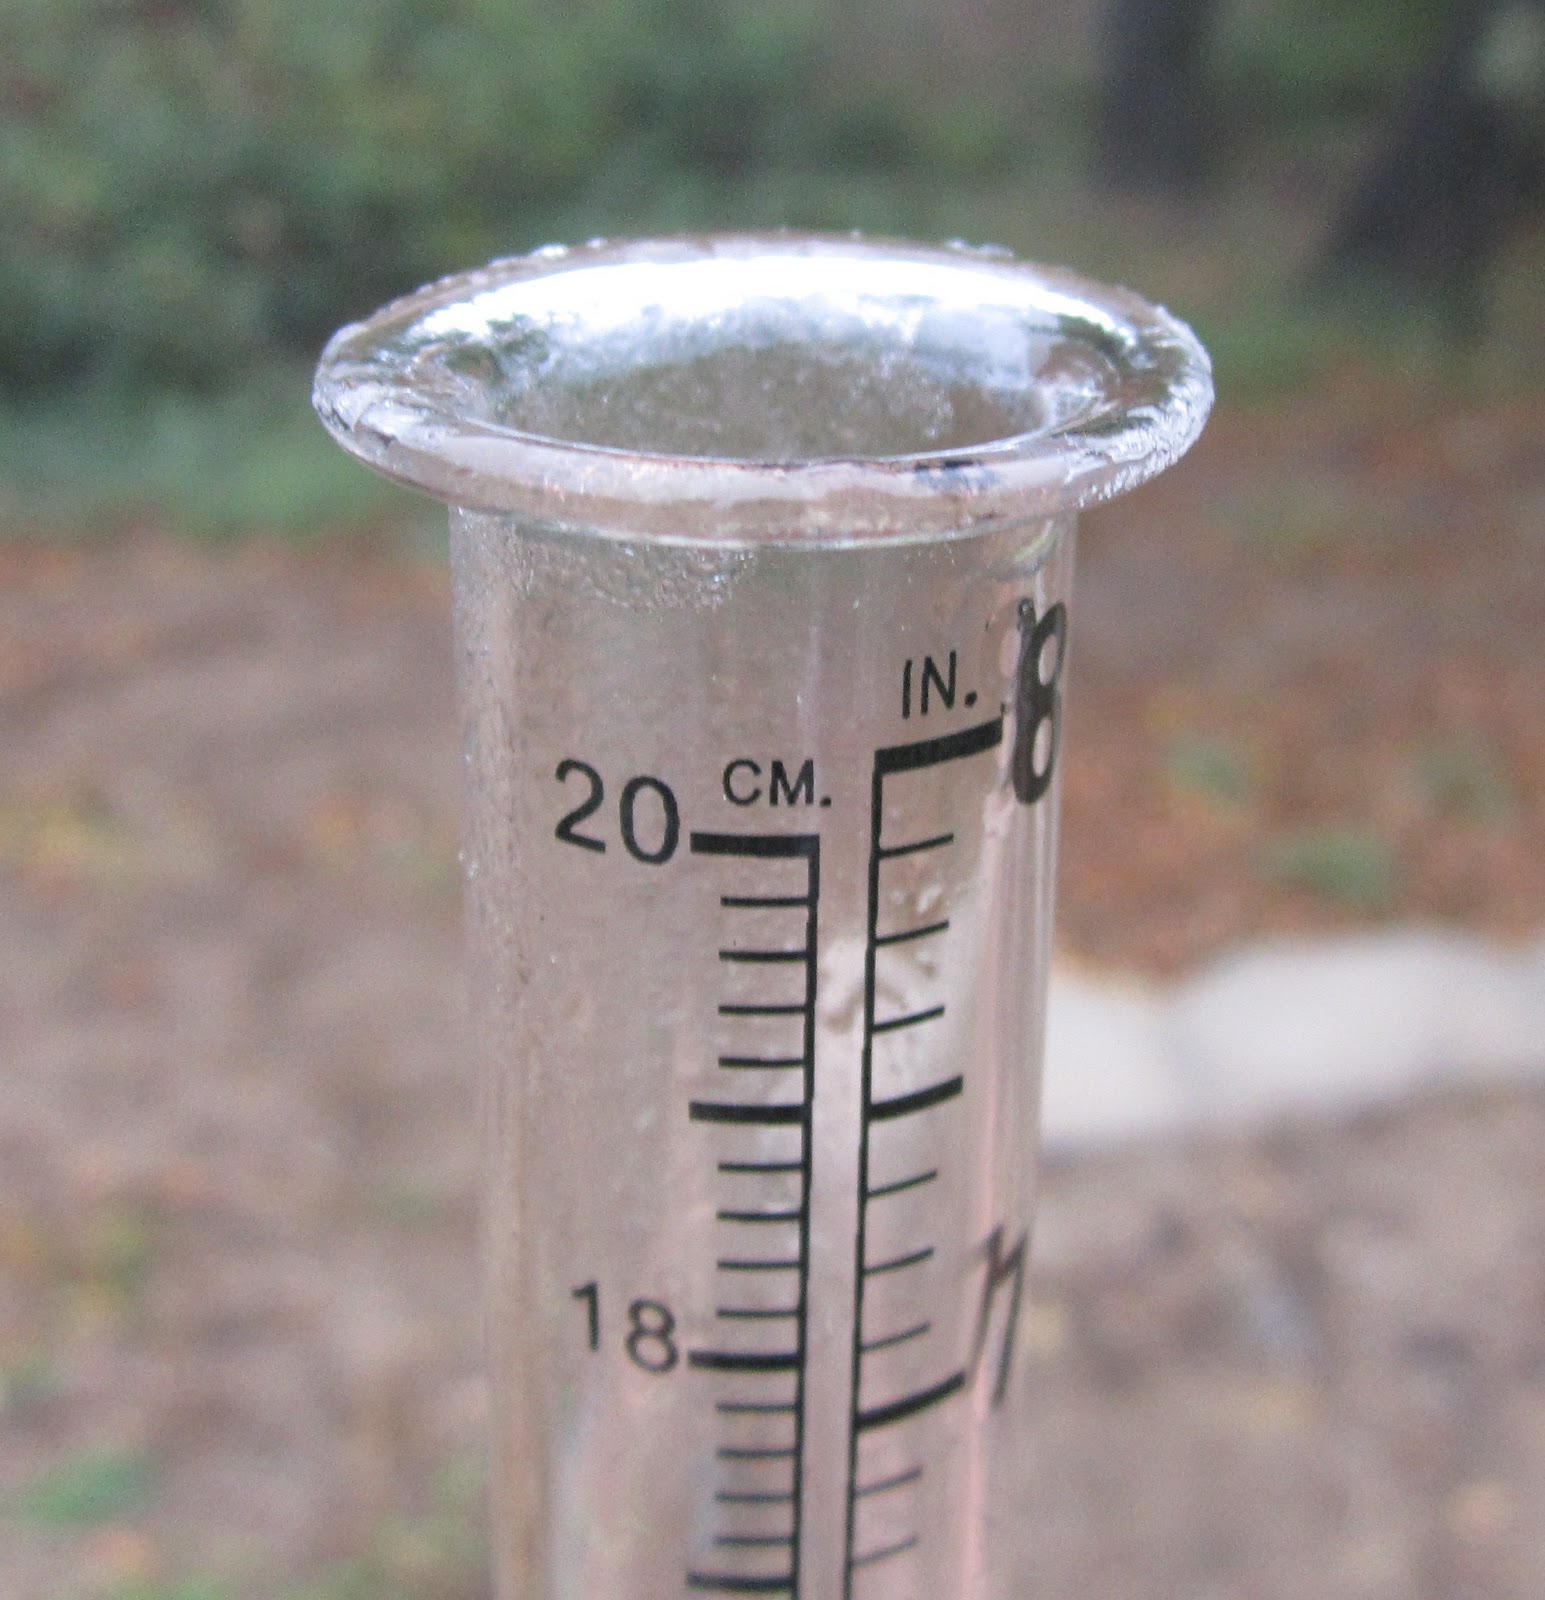
See that lip? Much of the rain that lands on it runs into the gauge, but the scale is calibrated only for the inner diameter of the tube. The net result is that the gauge collects a lot more water than it should given the scale, and the numbers are way off.
And since that lip is curved, I suspect wind has interesting affects too. If there is no wind as the rain falls it is possible that more of the water that hits the lip winds up in the tube. if there is wind, though, some may blow off the lip and result in a different - though still inaccurate - reading. This is speculation on my part, but so far this gauge doesn't consistently read as a multiple of any other gauge, so there is something odd going on.
Anyway, good rain gauges have a knife-like edge at the top to clearly define the collection area, not a hazy, rounded boundary like this one.
I will keep this gauge in the set and collecting data from it though I know it is useless for real record keeping. It is actually kind of fun to see just how far off it can be. More than 2X in this rain, obviously, but the range of differences is fascinating to a nerd like me.
There you have it... some information on the various gauges so far. Interesting to me, at least. Hopefully you too.
Monday, November 7, 2011
A Man With One Watch...
How many rain gauges does one person need?

Good question, eh? We are currently comparing five. Yes, really.
Why?
Well... The amount of rain we get during the rainy season matters to us, since it helps us anticipate how much water we can expect our well to produce during the following Summer and Fall.
In the picture above you can see the yellow plastic one that we have been using for about 19 years. It is starting to degrade due to constant UV exposure over the years, so it will only last so much longer. In addition, it's only good to 5" rain before it overflows. Believe it or not we get storm systems that dump more than that on us in 24 or 48 hours regularly, and that makes it inconvenient to deal with on occasion.
My wife bought the 8" rain gauge (with the decorative butterfly) on the right some time back in the hopes that it would give us a better reading on things, but the first few rains it saw - a couple last season and the first two this season - caused us to suspect it is wildly inaccurate. It regularly read twice what the yellow gauge showed, which caused me to start researching these things.
Eventually I settled on the other three gauges:
The one in the middle is a wedge shape, capable of measuring 6" of rain, with (apparently) high accuracy. However, accuracy drops as the amount of rain being measured in one shot goes up.
The 6" gauge with bronze numbers is from weather.com, and while it doesn't look any more accurate than the old yellow gauge, the actual accuracy remains to be seen.
And finally the large cylinder on the left is the official gauge that every weather reporting station in the country uses. It is capable of measuring 12" of rain, snow, or hail with (apparent) great accuracy, but it is harder to read if the total amount is over 1". A funnel directs rainfall into an interior cylinder, which overflows into the outer cylinder. The inner cylinder measures amounts up to 1" - easy to read down to 0.01" amounts - but you have to pour out the inner cylinder after reading it, pour the overflow into it, read, add to the total, and repeat until the outer cylinder is empty. So it is accurate, but not simple to use in a bigger storm.
Anyway, none of these is especially expensive, so I am testing them all, right next to each other, until I know which one(s) we like the most. Then I will get rid of the others and reduce the set.
Yes, I am insane. Yes, I am a data nut. But the only way to know what is going on is to have data, and unless all five gauges are wildly off, I will know in another few weeks which ones I like and why. I'll provide a detailed report - with numbers - and links to suppliers at that time.

Why?
Well... The amount of rain we get during the rainy season matters to us, since it helps us anticipate how much water we can expect our well to produce during the following Summer and Fall.
In the picture above you can see the yellow plastic one that we have been using for about 19 years. It is starting to degrade due to constant UV exposure over the years, so it will only last so much longer. In addition, it's only good to 5" rain before it overflows. Believe it or not we get storm systems that dump more than that on us in 24 or 48 hours regularly, and that makes it inconvenient to deal with on occasion.
My wife bought the 8" rain gauge (with the decorative butterfly) on the right some time back in the hopes that it would give us a better reading on things, but the first few rains it saw - a couple last season and the first two this season - caused us to suspect it is wildly inaccurate. It regularly read twice what the yellow gauge showed, which caused me to start researching these things.
Eventually I settled on the other three gauges:
The one in the middle is a wedge shape, capable of measuring 6" of rain, with (apparently) high accuracy. However, accuracy drops as the amount of rain being measured in one shot goes up.
The 6" gauge with bronze numbers is from weather.com, and while it doesn't look any more accurate than the old yellow gauge, the actual accuracy remains to be seen.
And finally the large cylinder on the left is the official gauge that every weather reporting station in the country uses. It is capable of measuring 12" of rain, snow, or hail with (apparent) great accuracy, but it is harder to read if the total amount is over 1". A funnel directs rainfall into an interior cylinder, which overflows into the outer cylinder. The inner cylinder measures amounts up to 1" - easy to read down to 0.01" amounts - but you have to pour out the inner cylinder after reading it, pour the overflow into it, read, add to the total, and repeat until the outer cylinder is empty. So it is accurate, but not simple to use in a bigger storm.
Anyway, none of these is especially expensive, so I am testing them all, right next to each other, until I know which one(s) we like the most. Then I will get rid of the others and reduce the set.
Yes, I am insane. Yes, I am a data nut. But the only way to know what is going on is to have data, and unless all five gauges are wildly off, I will know in another few weeks which ones I like and why. I'll provide a detailed report - with numbers - and links to suppliers at that time.
Sunday, September 25, 2011
Living With A Chromebook, Part 3
My other posts about the Chromebook are available here:
This post contains some additional notes on my Chromebook experience and isn't quite as upbeat as the others, I am sad to say.
Yes, I am still using my Chromebook heavily, but some flaws are more obvious to me now.
The single biggest problem for me is the feature that make the Chromebook more useful than any tablet: the keyboard. I continue to get key bounce - duplicate letters, numbers, or symbols entered when I am sure I typed only one. I cannot figure out the cause of this problem, and I am perpetually backspacing to delete the second appearance of whatever character it happened to this time.
Additionally there are issues with the trackpad. I've mentioned before that the button built into the trackpad is hard to click, so I turned on tap-to-click, which helps usability overall. That setting, however, may be the source of another problem, or it may just be my own sloppiness, but I regularly find myself staring at a screen in which large chunks of just entered text have gone away. Perhaps one or both of my thumbs (or wrists) hit the track pad as I was typing, but whatever I did, suddenly one or more paragraphs of text just vanish, as if I had selected an area and then replaced it with my continued typing. Except I didn't do that, at least not deliberately.
On top of all that, there is the keyboard feel itself. The Samsung Chromebooks have a keyboard similar to the newer Apple keyboards, with flat keys and limited key travel. Now that I have lived on it for a couple of months I know that it is not an acceptable substitute for a "real" keyboard, at least for me. The action is wrong, the feedback is poor, and my typing is worse on it than on a normal keyboard.
Yes, I could plug any USB keyboard into the Chromebook, but that reduces portability, and would require a mouse as well. The combination would probably eliminate the issues mentioned above, but then I might as well use my desktop machine, which, in fact, I find myself doing when I have substantial text to type.
The combination of those issues gets old. Perhaps some other Chromebook design will have a different keyboard and trackpad combination that works better, but I cannot claim to be happy with what Samsung built into my machine.
Another physical issue is display size. I need a bigger screen when I am doing anything complicated, and that just isn't an option with a Chromebook. Then again I think I would have the same problem with any laptop, so we can chalk that one up as my own issue, not one specific to the machine.
One place I can point to the machine and/or OS as having a real issue is in powering down. The Chromebook has a very nice feature that just lets you shut the cover to turn it off, and open the cover to restart it, right where you were. It's a sleep mode, effectively, and while it isn't new (many laptops have done it for years in other operating systems) it is very much faster than any other system I have used in this way. But sometimes - maybe 1 out of 20 - when I close the cover it doesn't shut down. Instead it continues to run as if nothing happened, and reopening doesn't prompt for a password, since it missed the shutdown signal entirely. Very odd.
A work around is to actually power down, which is still quick, though not as quick as shutting the cover. The boot is fast - another good Chromebook feature - but still not as quick as the restart, so while it will shut down this way it isn't as nice in all cases.
I continue to see some memory leaks, I think, and so I reboot once a week or so, at a minimum. Whether that helps or not is less than clear to me.
The machine also slows down at times that make no sense to me. My Internet connection isn't exactly speedy, so why is it that sometimes I cannot scroll a web page in one tab - possibly for two or three seconds - while the only other open tab is buffering a paused YouTube video? It's like interrupts for incoming network traffic - or perhaps memory allocation to buffer the incoming data - are heavy enough to slow the entire system way down. I can see this when loading non-video pages as well, but in those cases the pages I am loading tend to be large and complex, with lots of items for Chrome to fetch. These slowdowns aren't crippling, but they do cause irritation. I would be curious to know if others are seeing them, or if they are an artifact of my slow network connection in some way.
Finally, I think Google needs to add at least a few visual indicators to the system. I'd like a way to know if I am getting network traffic or not, how busy the CPU is, and whether or not a reboot is required to get updates to Chrome OS installed and running. As things stand there are no blinking lights or system monitors available, which means I don't have the feedback I need to know where problems are, or if a reboot would be a good idea. I can't even tell if the system is in the middle of downloading an OS update when I shut down. Not good design.
Despite the above issues I still use the Chromebook for most of my online activities. I don't have many apps installed, but that's my usage pattern. Overall it is quiet and adequately fast, and certainly good enough for handling email, social networking, blog reading, and the like. That's where most home users spend their time, and I think it will work well for that audience, but there are still some rough edges and I'd really like to see Google address them.
This post contains some additional notes on my Chromebook experience and isn't quite as upbeat as the others, I am sad to say.
Yes, I am still using my Chromebook heavily, but some flaws are more obvious to me now.
The single biggest problem for me is the feature that make the Chromebook more useful than any tablet: the keyboard. I continue to get key bounce - duplicate letters, numbers, or symbols entered when I am sure I typed only one. I cannot figure out the cause of this problem, and I am perpetually backspacing to delete the second appearance of whatever character it happened to this time.
Additionally there are issues with the trackpad. I've mentioned before that the button built into the trackpad is hard to click, so I turned on tap-to-click, which helps usability overall. That setting, however, may be the source of another problem, or it may just be my own sloppiness, but I regularly find myself staring at a screen in which large chunks of just entered text have gone away. Perhaps one or both of my thumbs (or wrists) hit the track pad as I was typing, but whatever I did, suddenly one or more paragraphs of text just vanish, as if I had selected an area and then replaced it with my continued typing. Except I didn't do that, at least not deliberately.
On top of all that, there is the keyboard feel itself. The Samsung Chromebooks have a keyboard similar to the newer Apple keyboards, with flat keys and limited key travel. Now that I have lived on it for a couple of months I know that it is not an acceptable substitute for a "real" keyboard, at least for me. The action is wrong, the feedback is poor, and my typing is worse on it than on a normal keyboard.
Yes, I could plug any USB keyboard into the Chromebook, but that reduces portability, and would require a mouse as well. The combination would probably eliminate the issues mentioned above, but then I might as well use my desktop machine, which, in fact, I find myself doing when I have substantial text to type.
The combination of those issues gets old. Perhaps some other Chromebook design will have a different keyboard and trackpad combination that works better, but I cannot claim to be happy with what Samsung built into my machine.
Another physical issue is display size. I need a bigger screen when I am doing anything complicated, and that just isn't an option with a Chromebook. Then again I think I would have the same problem with any laptop, so we can chalk that one up as my own issue, not one specific to the machine.
One place I can point to the machine and/or OS as having a real issue is in powering down. The Chromebook has a very nice feature that just lets you shut the cover to turn it off, and open the cover to restart it, right where you were. It's a sleep mode, effectively, and while it isn't new (many laptops have done it for years in other operating systems) it is very much faster than any other system I have used in this way. But sometimes - maybe 1 out of 20 - when I close the cover it doesn't shut down. Instead it continues to run as if nothing happened, and reopening doesn't prompt for a password, since it missed the shutdown signal entirely. Very odd.
A work around is to actually power down, which is still quick, though not as quick as shutting the cover. The boot is fast - another good Chromebook feature - but still not as quick as the restart, so while it will shut down this way it isn't as nice in all cases.
I continue to see some memory leaks, I think, and so I reboot once a week or so, at a minimum. Whether that helps or not is less than clear to me.
The machine also slows down at times that make no sense to me. My Internet connection isn't exactly speedy, so why is it that sometimes I cannot scroll a web page in one tab - possibly for two or three seconds - while the only other open tab is buffering a paused YouTube video? It's like interrupts for incoming network traffic - or perhaps memory allocation to buffer the incoming data - are heavy enough to slow the entire system way down. I can see this when loading non-video pages as well, but in those cases the pages I am loading tend to be large and complex, with lots of items for Chrome to fetch. These slowdowns aren't crippling, but they do cause irritation. I would be curious to know if others are seeing them, or if they are an artifact of my slow network connection in some way.
Finally, I think Google needs to add at least a few visual indicators to the system. I'd like a way to know if I am getting network traffic or not, how busy the CPU is, and whether or not a reboot is required to get updates to Chrome OS installed and running. As things stand there are no blinking lights or system monitors available, which means I don't have the feedback I need to know where problems are, or if a reboot would be a good idea. I can't even tell if the system is in the middle of downloading an OS update when I shut down. Not good design.
Despite the above issues I still use the Chromebook for most of my online activities. I don't have many apps installed, but that's my usage pattern. Overall it is quiet and adequately fast, and certainly good enough for handling email, social networking, blog reading, and the like. That's where most home users spend their time, and I think it will work well for that audience, but there are still some rough edges and I'd really like to see Google address them.
Sunday, August 28, 2011
Up on the roof
When we had our house painted - last January, for reasons I won't go into here - we had all the seams in the vertical siding caulked up. (Vertical siding is a PITA. Yet another lesson learned only after buying a house with that particular "feature". But I digress.... ) When the spring came, though, and the siding dried back out, a lot of the seams popped open, which looked ugly and was going to let water into places I didn't want it. So a major project to complete before the rains return is to recaulk and repaint all the seams that opened up.
Most of that effort involves only paint, a brush, and a ladder of one sort or another, but there is one wall over a fairly steeply pitched roof which took a bit more care.

That roof is shingled with Hardishake (another product that sounds a lot better than it actually works out to be, sadly, and another lesson learned only after buying a house using it, but again I digress. Oh, and the picture shows day two of the effort. I have already been up there to recaulk the seams, but yet again I digress.) Hardishake is slippery and fragile, so climbing on that slope without safety gear seemed like a bad idea. The above picture shows the roof with that gear in place. Here's what it looked like to my wife, from the ground, while I was working up there:

That's about a 10 foot fall off the roof onto concrete - if it happens - and I really wanted to avoid that particular fate. Alas I am not a professional climber of any kind and my gear is pretty limited. I have two good - but not locking - carabiners, some cheap rope, some nylon webbing, and I bought a climbing harness specifically for this job. That's it.
The rest of this writeup is for Chief Alex, who wanted to see pictures of what inanity I was doing to keep myself from being his next 911 response. The rest of you may wander off or read on as you see fit now that you've seen the above pictures.
First, I anchored my safety rig to the house, around a half inch threaded rod that is exposed and goes through multiple redwood beams before being held in with nuts & washers. Two independent webbing anchors (orange and yellow in the picture below) are tied with doubled webbing on either side of the beam. Each terminates in a loop tied with something similar to, but not actually, a figure 8 knot and several safety knots. Through those two loops I tied in my safety ropes. I had only one, but it is 100' long, so I doubled it, and tied a figure 8 knot - the world's ugliest, I admit - with a loop that went through the loops in the webbing, and then a safety not or two and then tape. Here's the resulting mess:

The webbing anchors look like this up close:

It's not obvious - our house is an architectural oddity - but the beam and threaded rod seen above are about eight feet above a flat roof, so I can easily get there to do the setup. Then the lines go up and over onto the roof you cannot see from those pictures, and trail down on the shingled side as seen in the first picture above. A pad is put over the corner of the roof just above the beam to protect the ropes. Next I put on my climbing harness and clipped in like this:

Note that each rope is paired, and that each pair ends in a figure 8 knot with a loop and a safety knot. The white and green tape seen above was for me to track which was which if needed, and each loop is really a pair of loops, so it's all redundant. The carabiners clip each of the loops to the harness independently.
The goal was that for nearly all the time I was working any one thing could fail and nothing bad would happen. If I lost a webbing anchor, I had a spare. If I lost a single rope, it was doubled to the harness. If I lost both ropes in a pair, I had a spare pair to catch me.
As the second picture shows, the risk was that I could slip, fall, and slide off the roof. What I needed was something to stop my slide if that happened, rather than catch my full weight on a vertical drop. The rig I arranged managed to do exactly that, and gave me an extra bit of leverage to move around on the roof with.
A challenge was that I had 15 feet of wall I am painting, and I had to move up or down the length of the wall as I worked on it. I managed that with the dual, paired lines. When needed I could move uphill a bit, unclip one of the lines, tie a temporary knot with a loop in it, and clip back in on that loop as well as the end loop. That let me keep the rope short so that if I fell I would only slide a foot or two before stopping. And, of course, I could work the other way, starting at the top with two shorter, temporary attachment points, work, then lengthen the ropes one at a time, always being clipped in to one or the other while doing so, then moving down the roof and working some more.
The biggest risk - I think - is that I was using non-locking carabiners, and that when I unclipped from one line to reset the length I was left on a single carabiner. At all other times I think everything was at least doubled up. Well, I suppose the harness itself counts as a single point of failure, but it's built to take some strain.
Anyway, the work on the sloped roof is done now except for putting a ladder up to sweep the debris down with a broom. No more walking on fragile shingles. I already had to glue a bunch back together as a result of this excursion and numerous others that have been done by painters, roofers, Internet connection installers, and exterminators over the years.
Thanks to Chief Alex for his training when I was part of the VFD - even if I only remember a fraction of it now - so that I could setup a system that let me get this job done with confidence and some measure of safety. He would have done it very differently, I know, but given what I had to work with I think I did OK.
Lots more projects remain to be done before the rains get here, but I don't think anything will require this sort of rig again.
Most of that effort involves only paint, a brush, and a ladder of one sort or another, but there is one wall over a fairly steeply pitched roof which took a bit more care.

That roof is shingled with Hardishake (another product that sounds a lot better than it actually works out to be, sadly, and another lesson learned only after buying a house using it, but again I digress. Oh, and the picture shows day two of the effort. I have already been up there to recaulk the seams, but yet again I digress.) Hardishake is slippery and fragile, so climbing on that slope without safety gear seemed like a bad idea. The above picture shows the roof with that gear in place. Here's what it looked like to my wife, from the ground, while I was working up there:

That's about a 10 foot fall off the roof onto concrete - if it happens - and I really wanted to avoid that particular fate. Alas I am not a professional climber of any kind and my gear is pretty limited. I have two good - but not locking - carabiners, some cheap rope, some nylon webbing, and I bought a climbing harness specifically for this job. That's it.
The rest of this writeup is for Chief Alex, who wanted to see pictures of what inanity I was doing to keep myself from being his next 911 response. The rest of you may wander off or read on as you see fit now that you've seen the above pictures.
First, I anchored my safety rig to the house, around a half inch threaded rod that is exposed and goes through multiple redwood beams before being held in with nuts & washers. Two independent webbing anchors (orange and yellow in the picture below) are tied with doubled webbing on either side of the beam. Each terminates in a loop tied with something similar to, but not actually, a figure 8 knot and several safety knots. Through those two loops I tied in my safety ropes. I had only one, but it is 100' long, so I doubled it, and tied a figure 8 knot - the world's ugliest, I admit - with a loop that went through the loops in the webbing, and then a safety not or two and then tape. Here's the resulting mess:

The webbing anchors look like this up close:

It's not obvious - our house is an architectural oddity - but the beam and threaded rod seen above are about eight feet above a flat roof, so I can easily get there to do the setup. Then the lines go up and over onto the roof you cannot see from those pictures, and trail down on the shingled side as seen in the first picture above. A pad is put over the corner of the roof just above the beam to protect the ropes. Next I put on my climbing harness and clipped in like this:

Note that each rope is paired, and that each pair ends in a figure 8 knot with a loop and a safety knot. The white and green tape seen above was for me to track which was which if needed, and each loop is really a pair of loops, so it's all redundant. The carabiners clip each of the loops to the harness independently.
The goal was that for nearly all the time I was working any one thing could fail and nothing bad would happen. If I lost a webbing anchor, I had a spare. If I lost a single rope, it was doubled to the harness. If I lost both ropes in a pair, I had a spare pair to catch me.
As the second picture shows, the risk was that I could slip, fall, and slide off the roof. What I needed was something to stop my slide if that happened, rather than catch my full weight on a vertical drop. The rig I arranged managed to do exactly that, and gave me an extra bit of leverage to move around on the roof with.
A challenge was that I had 15 feet of wall I am painting, and I had to move up or down the length of the wall as I worked on it. I managed that with the dual, paired lines. When needed I could move uphill a bit, unclip one of the lines, tie a temporary knot with a loop in it, and clip back in on that loop as well as the end loop. That let me keep the rope short so that if I fell I would only slide a foot or two before stopping. And, of course, I could work the other way, starting at the top with two shorter, temporary attachment points, work, then lengthen the ropes one at a time, always being clipped in to one or the other while doing so, then moving down the roof and working some more.
The biggest risk - I think - is that I was using non-locking carabiners, and that when I unclipped from one line to reset the length I was left on a single carabiner. At all other times I think everything was at least doubled up. Well, I suppose the harness itself counts as a single point of failure, but it's built to take some strain.
Anyway, the work on the sloped roof is done now except for putting a ladder up to sweep the debris down with a broom. No more walking on fragile shingles. I already had to glue a bunch back together as a result of this excursion and numerous others that have been done by painters, roofers, Internet connection installers, and exterminators over the years.
Thanks to Chief Alex for his training when I was part of the VFD - even if I only remember a fraction of it now - so that I could setup a system that let me get this job done with confidence and some measure of safety. He would have done it very differently, I know, but given what I had to work with I think I did OK.
Lots more projects remain to be done before the rains get here, but I don't think anything will require this sort of rig again.
Subscribe to:
Posts (Atom)